Accruent MC v2023 Upgrade Instructions
About
This document outlines the steps for upgrading your On-Premise installation of Maintenance Connection. It provides instructions for all the current Maintenance Connection products, so some of these steps may not apply to your organization. If you have any questions about the upgrade or have any issues during the process, please contact MC Support by creating a Support Case on Accruent Access or you can email us at mcsupport@accruent.com.
Upgrade pre-check
These instructions help you verify that your user and environment have the correct permissions and settings in place to perform a successful upgrade.
User permissions needed to upgrade
The person performing the upgrade should be a system administrator level user and may be required to complete tasks related to:
-
Having full control over file folders
-
Granting new permissions (sysadmin rights) to SQL Server users
-
Taking full database backups
-
Installing .NET or Microsoft Powershell modules
-
Administering the IIS module Accruent
MC offers services to perform this upgrade for you. If you have any concerns about performing the upgrade yourself, reach out to our Sales or Support team to learn more about the upgrade services we offer.
System requirements
Verify that the following items are installed on your server before starting your upgrade.
If you run the upgrade and these items are not present, the upgrade will stop before any changes are made to your applications.
-
Powershell 5+/Windows Management Framework(App/Web Server)
-
TLS 1.2 (All Servers)
-
Nuget Package Provider (All Servers)
-
Sql Server Powershell Module (All Servers)
-
PSIni Powershell Module (All Servers)
-
NTFSSecurity Powershell Module (App/Web Server)
-
.Net Framework 4.8 Runtime (All Servers)
-
.Net Core 6.0 with hosting bundle (Web/App Server)
-
.Net Core 6.0 Runtime for desktop apps (All Servers) *Required for the installer, download the x64 or x86 for the “Run desktop apps” option
-
.Net Core 6.0.x with hosting bundle (Web/App Server)
-
Web-Server Windows Feature (Web/App Server)
-
Db Connectivity (If you are using windows authentication, the user that runs the install must have access to the database)
-
Windows Server 2016 (All Servers)
-
Sql Server 2016 + (Db Server only)
-
Database Connectivity (if you are using windows authentication, the user that runs the install must have access to the database)
-
Client Browser: Use Google Chrome, Microsoft Edge, or Safari for optimal performance
Additional requirements and upgrade considerations
-
Your database compatibility mode must be using SQL Server 2016 at a minimum and utilizing MSOLEDBSQL. Learn more.
-
Clients need internet connectivity to use some features, requiring you to have a valid hostname configured and bound to the website.
Server spec minimum requirements
-
Windows Server 2016
-
Dual Core: 1.4GHz+ Processor
-
4GB RAM
-
10GB Disk Space
-
IIS 10.0
-
SMTP Server Access
-
Microsoft SQL Server 2016 (standard or higher)
-
.NET Framework Microsoft .NET 6.0
SQL Server user permissions
The account used for the SQL Server connection requires the sysadmin server role to run some of the scripts. Once the upgrade is complete, the sysadmin server role can be removed.
The user performing the update requires the explicit sysadmin role and cannot inherit these permissions as being part of the group.
Validate the person performing the upgrade has the sysadmin role on their SQL Server Roles page.
Verify the account used for SQL Server connection.
-
On the web server, open IIS and navigate to the mc_web application.
-
Right-click mc_web and select Explore.
-
Open the mc.ini file in a text editor.
A User ID, which is the SQL authenticated account, displays in the Registration Database section. This requires the sysadmin server role.
If the setting for Integrated Security equals 1, this means your company uses a Windows Authenticated account. Be sure that Windows Account has the sysadmin server role.
If you are unsure how to add the sysadmin server role to your account, please notify your database administrator.
SQL database backups
Before you start your upgrade, make sure you have the latest database backups available to you in case there is any issue with the upgrade and you need to revert to your previous version. Be sure to take a FULL database backup.
Here are the databases that need backups:
-
Registration database: Usually titled “MCRegistrationSA”
-
Entity databases: These databases begin with "ent" and your company may have multiple.
You can use the following SQL Query against your MCRegistrationSA database to determine the exact database names.
USE mcRegistrationSA
SELECT 'ent' + container_code AS Database_Name
FROM dbo.container
WHERE is_enabled = 1
Save the backups in a place that is easily accessible.
IIS configuration backup
Before you start your upgrade, make sure that you have also taken a backup of your IIS configuration on your application server. Execute the script below inside of Powershell on your application server (the server that runs IIS) to create an IIS Backup.
$backupName = "IIS_Config_Snapshot_$($(Get-Date).ToString("yyyyMMdd_HHmmss"))"
& $env:SystemRoot\System32\inetsrv\appcmd.exe ADD backup "$backupName"
Don’t forget to save the name of the backup that was created!
For rollback purposes (if needed), you can restore the backup with the powershell below. Replace the date/time stamp portion of the name with the backup name provided to you when the backup was created.
# Restore the backup
$backupNameToRestore = "IIS_Config_Snapshot_20231023_172501"
& $env:SystemRoot\System32\inetsrv\appcmd.exe RESTORE backup "$backupNameToRestore"
Pre-check complete
If you have any questions or have trouble with any of these steps, email mcsupport@accruent.com or sign in to Accruent Access submit a ticket, and we will be happy to assist.
Download upgrade files from Accruent Access
All the downloads you need for the upgrades (as well as more upgrade help) can be found on Accruent Access.
-
Sign in to Accruent Access at https://access.accruent.com
You need to use a Google Chrome or Microsoft Edge browser to access the site.
-
Go to My Products.
-
Click Upgrade Now.
All upgrade files are available here for download. This is also a resource center for your upgrade, providing additional help content.
Upgrade instructions
In addition to the primary upgrade package (which we call “Core”), you can also use these instructions to install the MC Express and API upgrade packages. If you are installing multiple upgrade packages, install them in this order:
-
Upgrade LoginHub (for LoginHub users only)
-
Core upgrade
-
MC Express upgrade
-
API upgrade
Login Hub users should install the Login Hub update package first. Instructions for this are given below.
The upgrade process creates a new folder structure for each application and each attempt at an install. If you attempt to perform the installation multiple times, you might need to clear out previous versions of the file folders to reserve server space.
Upgrade LoginHub (LoginHub users only)
Follow steps 1 2 3 to upgrade LoginHub, please do this first.
Installation process
-
Download the appropriate zip file (Core, MC Express, or API) from Accruent Access.
If you have a multiple-server setup (such as where the application server is separate from the database server), complete the following steps on the application server.
-
Move the downloaded zip file inside a new folder called “MC Install” on a main drive.
We recommend a data drive (a D: or E: type of a drive), but you can also use the C: drive.
Avoid running the zip directly from the downloads folder.
-
Right-click the zip file, select Properties, and Unblock if necessary.
-
Right-click the zip file again and select Extract All…
You can change the extraction location in the dialog that opens if needed.
-
In the folder you extracted the files to, right click the OnpremInstaller.exe executable and select Run as administrator.
If you get an alert from Windows Defender stating that it has detected an unrecognized app, select More Info and validate the app is entitled “OnpremInstaller.exe”. Then click Run anyway.
-
In the Maintenance Connection OnPrem Install/Upgrade tool that opens, click Gather Variables from Current Application.
-
Wait for the success message:
"Gather Variables complete, please verify variables.json file contains the correct settings and modify if needed "
-
Open the Variables File in a text editor.
You can click the Variables File link directly, but it might open with Visual Studio by default. You can locate the file using the path shown in the link and right-click to open with a text editor. We recommend Notepad ++ or Visual Studio Code (both free).
-
Verify all variables in the JSON file have the correct values.
-
In the Maintenance Connection OnPrem Install/Upgrade tool, click Install or Upgrade Core.
-
Wait for the success message:
“Completed script file execution”
If there are any errors that occur during the upgrade, they will appear in red in the console with a prefix of “ERR”.
If you receive an error message, the error is captured in a log file. Locate the log file and send it to mcsupport@accruent.com for further assistance. You can find the log file in the Logs folder in the same location you ran the OnpremInstaller.exe.
-
Close the Maintenance Connection Onprem Install/Upgrade tool.
-
Repeat steps 1-12 for the remaining upgrade packages.
Here is an example of the variables.json file.
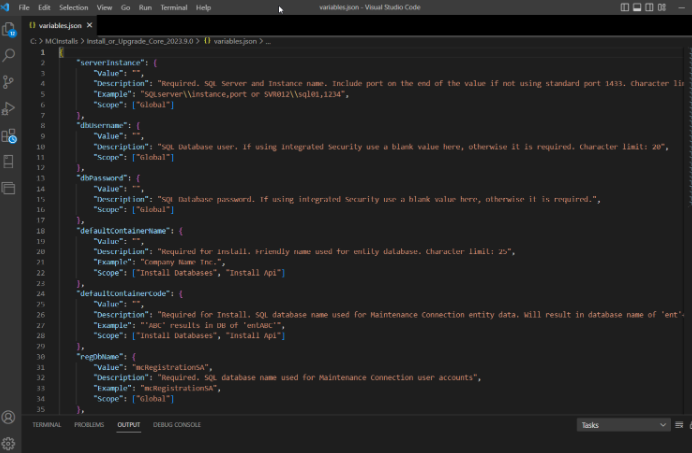
The variables.json file is the same file across all packages. If you are installing multiple packages (Core, MC Express, and API) you can fill it out once, then copy it into the other package installation folders. There is a check to ensure only one JSON file is present in the top level of the package folder.
Upgrade complete
You have now completed your upgrade for Maintenance Connection.
Here are some next steps:
-
Let all your users know that they need to exit MC, clear their browser cache, and log back in to Maintenance Connection (HTTP://SERVER-NAME/mc_web) to access the upgraded version.
-
Email upgrade@maintenanceconnection.com to let us know that you have completed your upgrade.
The email body can be as simple as this:
Company Name: [your company name]
I have completed all the steps to upgrade Maintenance Connection to version 2023.9.