Reporter tips and troubleshooting using SQL
This article is designed to help Administrators and/or IT personnel with Reporter related items that may be resolved or improved with SQL scripts. Select the title below that describes the issue you may be facing, and follow the directions given.
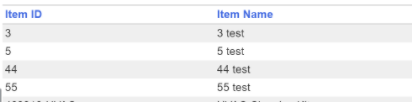
Some ID fields are set up as text fields in the system, which causes them to display alphabetically in the List pane. Users who prefix these fields with numbers can see records displayed in numerical order within a Report.
It is vitally important for each organization to follow consistent ID and naming practices within MC, but there will always be pro's and con's to every system. For instance, many organizations use only numeric characters for their ID fields, which can be a useful strategy. But certain ID fields (like Asset ID's, Part ID's, and Purchase Order ID's) are organized alphabetically in the List view because they are text fields rather than numeric fields. These organizations have to accept that, in the List view, their ID's will not be listed in order. As an example, if you have 12 Part ID's numbered 1-12, they would be ordered 1, 10, 11, 12, 2, 3, and so on. Using this convention, there is no way to show these Parts in their proper order within the List view, but it is possible to do this using Reports. In the Reporter module, we can adjust Report fields with Custom Expressions to make the ID fields appear in numerical order. This article will explain how to set up Reports to sort ID fields numerically.
Sorting Part ID's Numerically
We will begin by walking through the process of sorting Part ID's numerically in an Inventory Report. By making a few adjustments, we can follow this same process to sort any text fields numerically within a Report. These adjustments will be discussed in detail in the next section of this article.
-
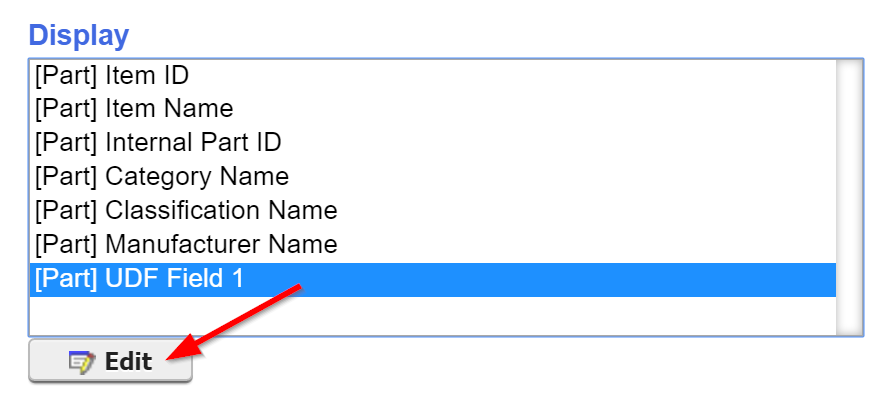
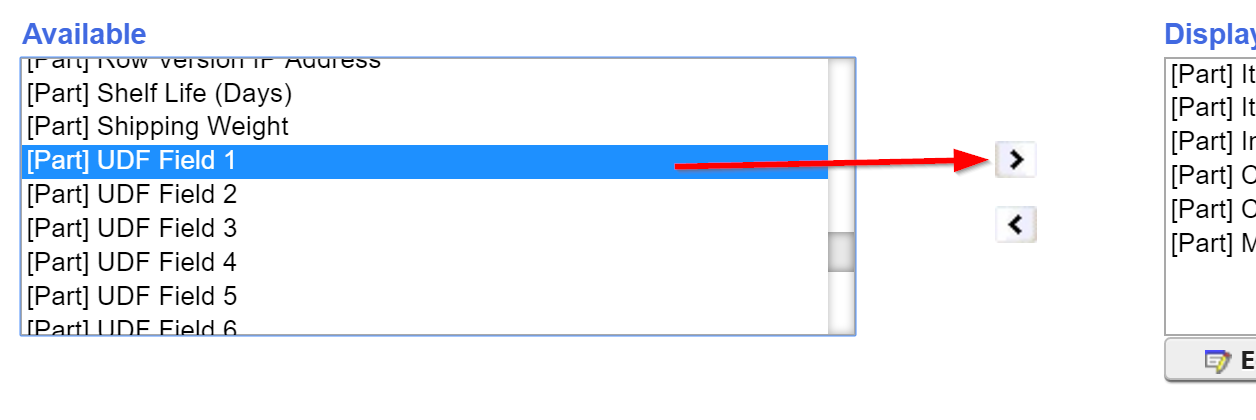
In the Report Setup of an Inventory Report, select [Part] UDF Field 1 in the Available fields list, and move it into the Display fields list. Keep in mind that we could use any of the UDF fields for our purposes here.
- The Report Field Options dialog will appear. Here, we can give the field a custom label, and we will need to set the Field Type (Custom) to Integer.
-
Next, we need to provide an Alias. In this example, we will use UDFChar1 to coincide with UDF Field 1. If you were using UDF Field 2, the Alias would be UDFChar2, and so on.

- Now we can input the following expression in the Custom Expression textbox. This will allow any Part ID's with all numeric characters to be sorted numerically. Any ID's with alphanumeric characters will have 999 added to the front of their PK value, thus moving them below the purely numeric ID's. This is to ensure there will be no conflict with ID and PK fields from different records matching:
						CONVERT(INT,CASE ISNUMERIC(PART.PARTID)
							WHEN 1 THEN PART.PARTID
							ELSE '999' +CONVERT(varchar(9),Part.Partpk)
					END)
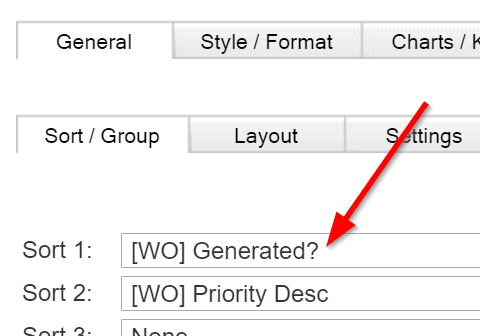
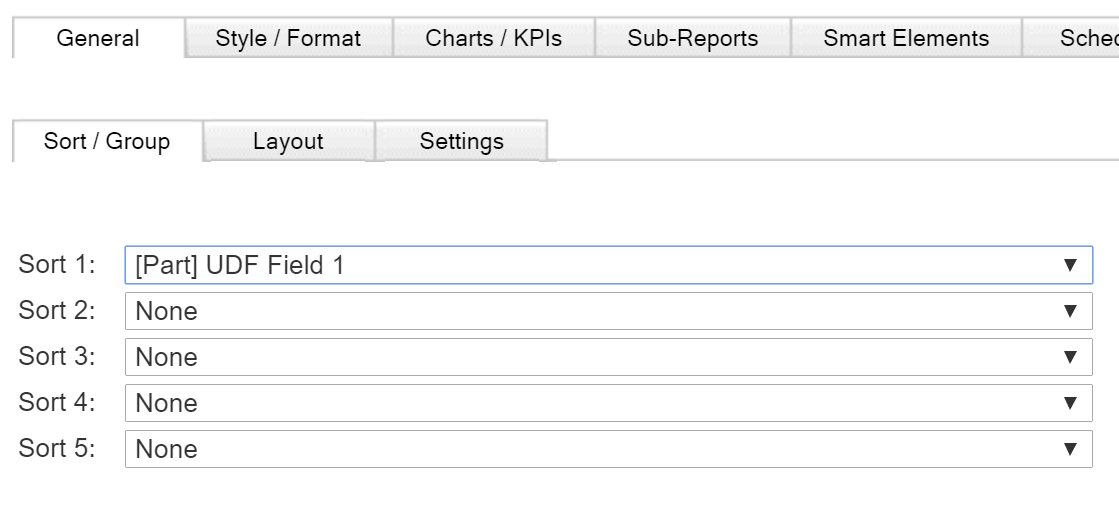
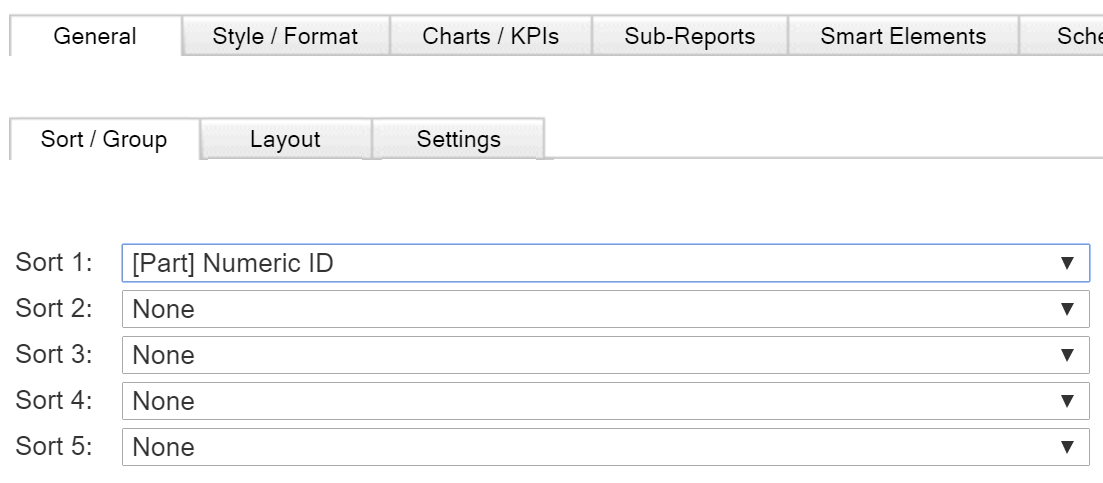
- Finally, we need to go to the Sort 1 option in the General > Sort/Group sub-tab, and ensure it is set to [Part] UDF Field 1 so that the Custom Expression we just added will be the basis for sorting the Report. Once again, keep in mind that we would need to choose the Sort field that matches the field we edited with the Custom Expression (UDF Field 1 with UDF Field 1, etc.). You should also note that, once the Report is saved, your UDF Field will be labeled as you defined it within the Report Setup:
Sorting Other Text Fields Numerically
As mentioned earlier, we want to show how to use this process with other text fields besides Part ID. In the Custom Expression shown above, you will notice three statements shown in bold green. These are the statements that will need to change depending on which text fields you are wanting to sort numerically. Every other step in the process would be identical.
- You would use the following Custom Expression for sorting Asset ID's:
						CONVERT(INT,CASE ISNUMERIC(ASSET.ASSETID)
							WHEN 1 THEN ASSET.ASSETTID
							ELSE '999' +CONVERT(varchar(9),Asset.Assetpk)
					END)
- You would use the following Custom Expression for sorting Purchase Order ID's:
						CONVERT(INT,CASE ISNUMERIC(PURCHASEORDER.POID)
							WHEN 1 THEN PURCHASEORDER.POID
							ELSE '999' +CONVERT(varchar(9),PurchaseOrder.PurchaseOrderpk)
					END)
A bit field (or checkbox field) simply reflects a yes or no. For example, the Asset.Warranty? field reflects whether or not an Asset is under warranty. When included in a report, this field displays as a checkbox--checked if the Asset has a warranty, unchecked if not. Simple enough, right?
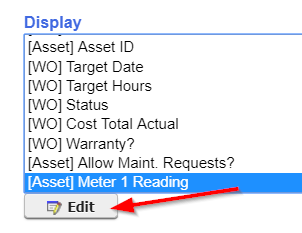
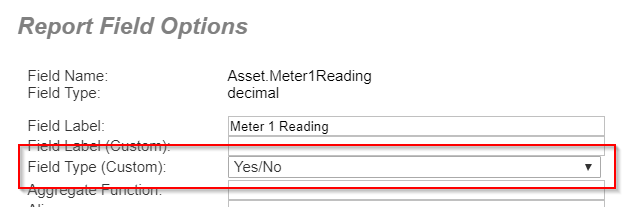
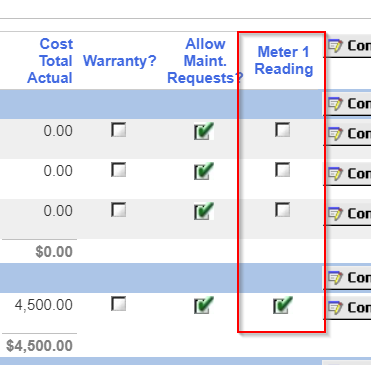
But, what if you want to display a numeric field as a checkbox in a report? You may want to see if a field like Asset.Meter1Reading has a value or not. You can use a Custom Expression to convert this numeric field into a checkbox on the report. To do this:
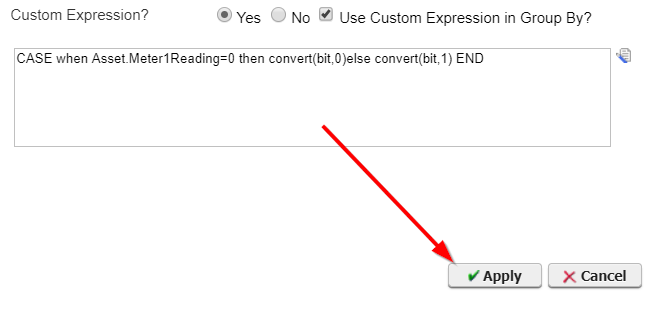
- In the Custom Expression textbox enter the following expression:
CASE WHEN Asset.Meter1Reading=0 THEN CONVERT(bit,0) ELSE CONVERT(bit,1) END
Tip: With a little more SQL savvy, you can also convert other field types (Date fields, Text fields) into bit fields on a report.
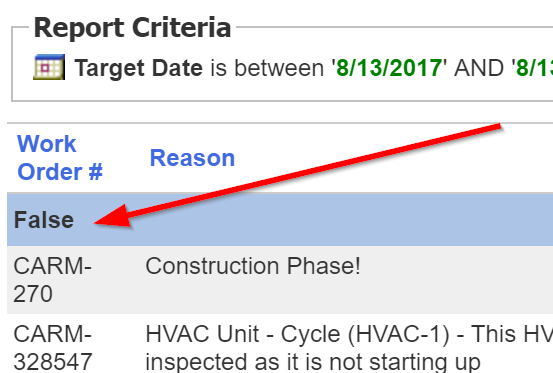
As mentioned in the previous segment, some fields in Maintenance Connection simply reflect a True/False or 1/0 value. For example, the Work Order IsGenerated? field will only tell you whether or not a Work Order is generated. If you want to group Work Orders on a report based on whether or not they have been generated, the headers would simply read "True" or "False," which is not especially helpful:
But, we can use Custom Headers so that these fields display more helpful information. In this segment, we'll show you how to adjust the Work Order IsGenerated? field so that generated Work Orders display under the custom text header "PM" and un-generated Work Orders display under the custom text header "Request."
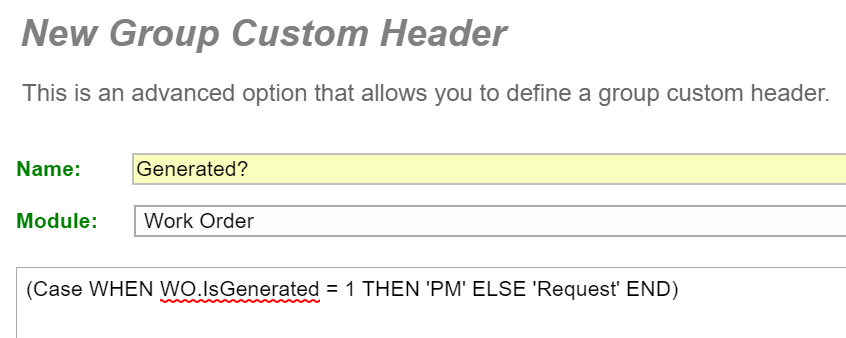
- In the dialog that appears, type "Generated?" into the Name field, set the Module to "Work Order," and then input the following SQL statement into the textbox:
(Case WHEN WO.IsGenerated = 1 THEN 'PM' ELSE 'Request' END)
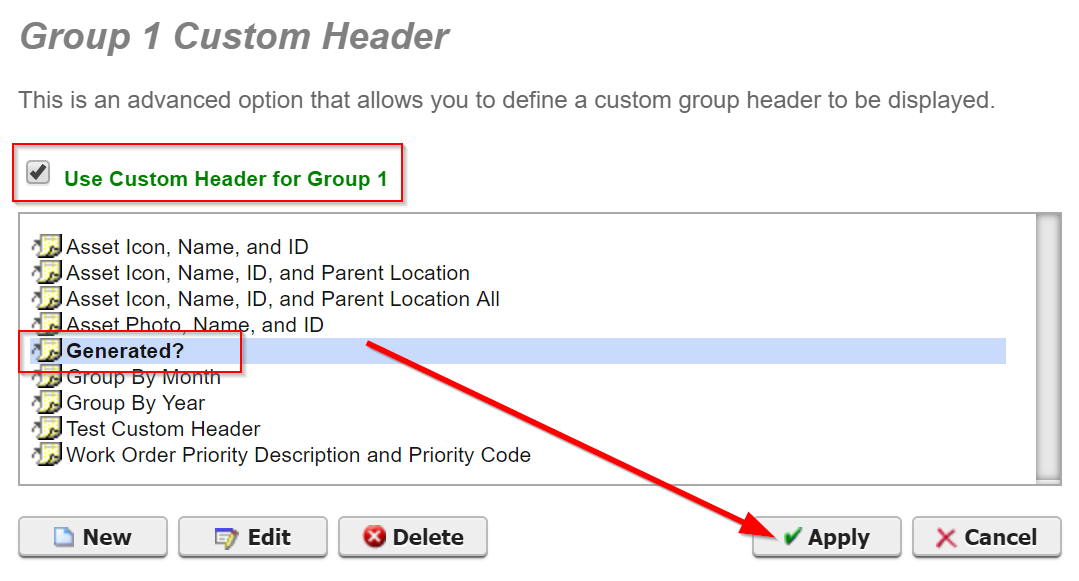
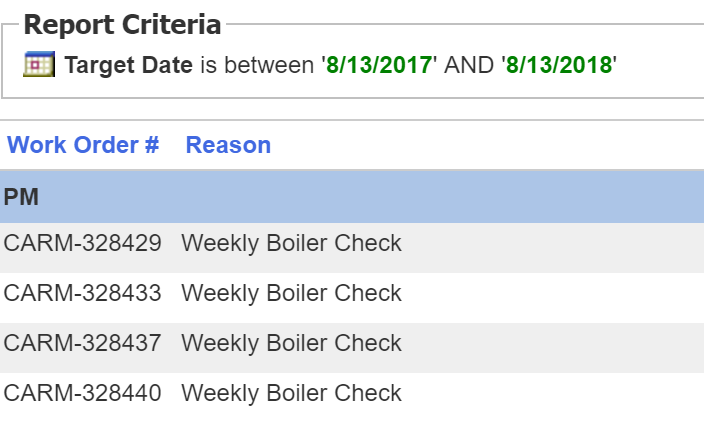
- Apply the changes in the Report Setup and double check the results displayed on the report:

You can this process for similar True/False fields (like IsAssigned? or IsApproved?) or other bit/checkbox fields (such as the bit field indicating whether or not a Work Order has Attachments), allowing you to display more useful information on reports.
There may be times in which a Report Schedule sends out multiple, duplicate Emails. Typically when this problem occurs, someone receives three copies for one scheduled report. These SQL scripts may resolve this issue.
This scenario can be caused by the ReportSchedule table having duplicate entries, which can take place when a report is copied, deleted, or the report schedule is edited or deleted. We can confirm if there are multiple Report Schedules for the same report within the ReportSchedule table by reviewing the results retrieved by running the below SQL queries:
						Select * FROM ReportSchedule
					WHERE ReportScheduleName = Enter in exact Report Name here
If we find that we have duplicate results, we can use the ReportSchedulePK field for the Report Schedule(s) we need to disable. Utilize the following SQL:
						UPDATE ReportSchedule WITH (ROWLOCK)
						SET
						IsActive=0
					WHERE ReportSchedulePK = Insert-ReportScheduled-PK-Here
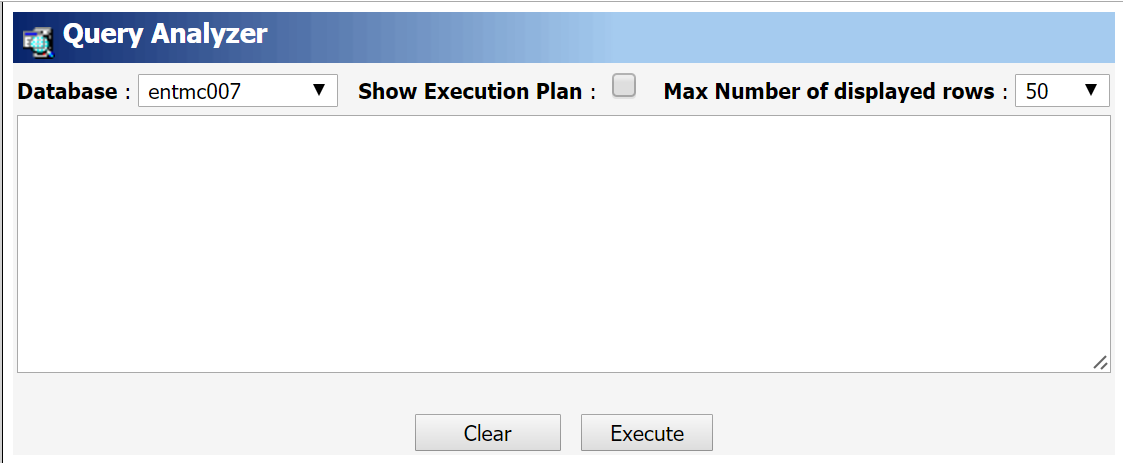
Note: If have sufficient access group rights, you can run these scripts in your Query Analyzer to retrieve the results.
Report Criteria - Can't Select from Dropdown
Background Information
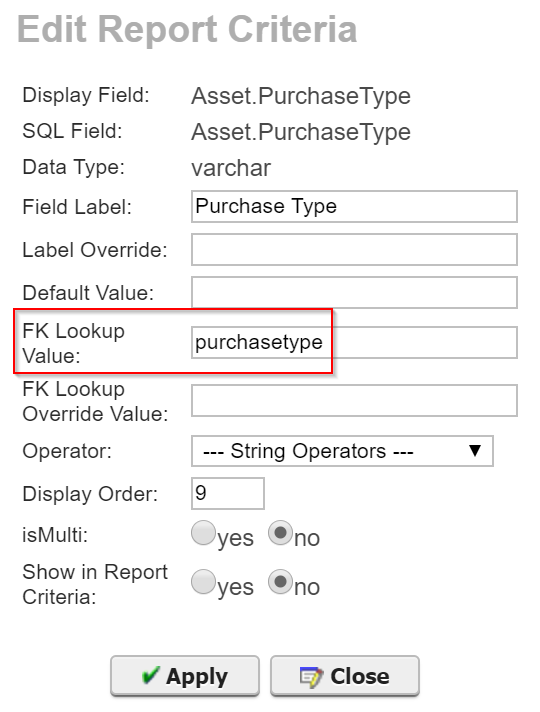
Inside the Reporter's Criteria dialog, the following script error may appear when making a selection for Asset.PurchaseType:

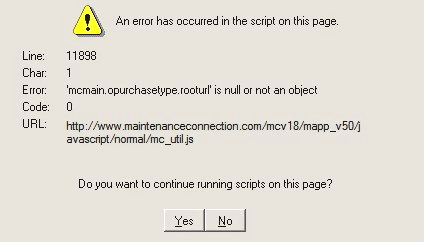
This occurs as a result of the FK Lookup Value field not being blank. The Lookup Table ID for the Asset Purchase Type field actually goes into the DataDict.Lookup_Table_Name column:
Resolution
This error can be corrected by running the following SQL against the ENT database. After running the script, log-off and then log back into the system. You will then be able to add Asset Purchase Type criteria to the report.
						UPDATE DataDict WITH (RowLock)
						SET
						LOOKUP_TABLE_NAME = 'PURCHASETYPE'
						,FK_Lookup = NULL
					WHERE COLUMN_NAME = 'PURCHASETYPE'
We hope this article provides the SQL solutions you are looking for. For more content on Reporter basics, or for more advanced training in the Reporter, please check out the remaining articles in this section of our Knowledge Base.
SQL DISCLAIMER: The SQL scripts in this article has been written for the purpose described in the associated documentation. No Changes should be made to the SQL scripts. If you have any questions please contact the Support team before running.
 Sort ID Text Fields Numerically in Reporter