Inventory parts basics
Learn the basic steps for creating and managing parts and adding them to work orders.
The Inventory module helps you manage the parts you use to maintain assets. This article walks through the creation of a part, understanding cost rules and defining other important elements of a part, and how to add a part to a work order for the maintenance of an asset.
 Creating a part
To create a new part record in Maintenance Connection:
-
Access the Inventory module from the module menu.
-
Click New in the upper left of the page.
The New Item page opens.
-
Enter a Name and Part ID.
These are required fields. Be sure to follow a consistent pattern in assigning names and IDs to parts.
-
Optionally, associate the part with a Classification and Category.
Classifications and categories group parts by type, helping you organize your inventory and creating more detailed data for building inventory reports.
-
Save the new part.
The part is added to the Inventory module.
Unless you're creating a direct-issue part, the next step is to add the part to a stock room.
Adding a part to a stock room
Once a part exists in the Inventory module, you can add it to a stock room. A stock room in Maintenance Connection represents a physical stock room or warehouse where you store parts and from which parts are pulled in fulfilling a work order. Stock rooms are the means by which you can track inventory counts.
To associate a part with a stock room:
-
Access the part you want to add to a stock room and open Locations.
Stock Room locations opens by default.
-
Click Add.
The stock rooms lookup opens.
-
Select a stock room.
A dialog opens with several required fields, all of which have default values populated.
-
Enter an On Hand amount for the part.
This indicates the number of this part in the stock room, minus any parts already reserved for work orders.
-
Optionally, enter a Reorder Point.
This indicates the on-hand amount at which you should order more of the part. This value can auto-populate line items in a purchase order.
-
Click Apply/Close.
Locations > Stock Rooms opens for the part, listing the stock room you just added the part to.
-
Save the part.
You can now add this stocked part to a work order.
Understanding cost rules for parts
Before adding parts to a work order, you need to understand how to measure part costs against a work order. Maintenance Connection helps in this process with the ability to define cost rules. You can set up a cost strategy for each part, allowing you to estimate the cost for the part when adding it to a work order, and thus estimate the total cost for maintaining particular assets.
The following cost rules can be associated to a part, under Cost/Charge Info (per Issue Unit) of the part Details.
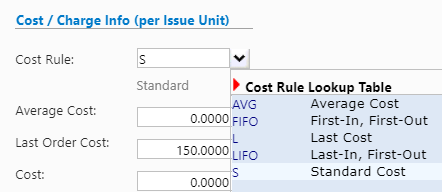
-
Average Cost - estimates part cost based on the average cost of all past purchases
This average automatically populates the Average Cost field in the part Details, or you can manually input a value into this field.
-
First-In, First-Out - pulls the part cost from the purchase order line items in descending order as they were received
The FIFO cost rule works in conjunction with the Purchase Order module, and is more complex in execution than the other cost rules.
-
Last Cost - estimates the part cost based solely on the last time it was purchased.
This value automatically populates the Last Order Cost field in the part Details.
-
Last-In, First-Out - pulls the part cost from the purchase order line items in ascending order as they were received
LIFO works in the reverse of FIFO, and also involves a more complex execution and the usage of the Purchase Order module.
-
Standard Cost - pulls the part cost from the Standard Cost you manually enter in the part Details.
This is the simplest most commonly used cost rule.
The Average Cost and Last Cost methods are highly recommended approaches. If you want all of your inventory parts to use one of these cost rules, check out the Inventory tips and troubleshooting using SQL article, under the "Cost Rule Sync for Inventory Parts" header. The LIFO and FIFO cost rules could potentially cause major problems in your inventory management system if not used correctly. Because of this, take a look at our best practices article on using LIFO and FIFO, and be sure to reach out to our Customer Success team before implementing these rules.
Adding vendors for parts
When it's time to order more parts, Maintenance Connection lets you associate parts with vendors to streamline the ordering process.
To add a vendor to a part:
-
Access the part you want to associate a vendor to and click Vendors.
-
Click Add.
The Company lookup opens with all configured vendors listed.
-
Select a vendor from the list.
A dialog opens with information to specify about the vendor association, including:
-
Stock Room - select a stock room only if the parts purchased from this vendor should be received by a single stock room; if any stock room can receive the part, leave the field blank
-
Priority - determines the preferred vendor if the part is tied to multiple vendors, 1 being the most preferred
-
Vendor Item ID - the unique identifier the vendor uses for the part; it is unlikely to match the Part ID you chose in the part creation process
-
-
Click Apply/Close when you're done filling in information about the vendor association.
The Vendors page opens for the part with the new vendor listed.
-
Save the part.
With a stock room and vendor associated with a part, you can order parts in an expedient way. For more on the ordering process, see How to order and receive parts.
Adding a part to a work order
With parts well-configured, you can add them to work orders and track their counts.
To add a part from a stock room to a work order:
-
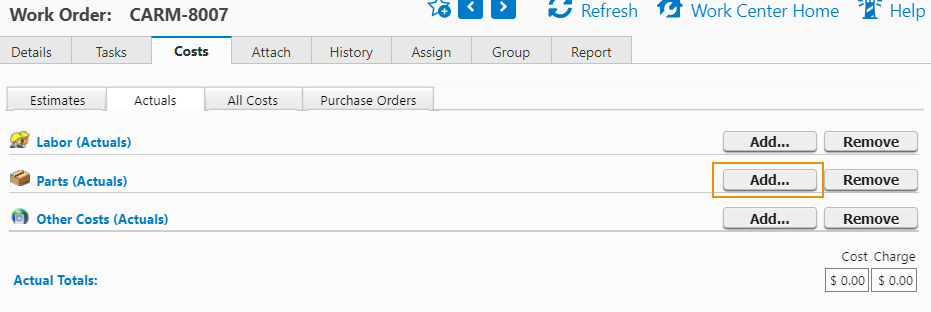
Access the work order you want to add a part to and open Costs.
-
Open the Actuals sub-tab and click Add for Parts (Actuals).
The Parts lookup opens.
-
Select the stock room on the left from which you want to pull a part.
-
Select the part you want to add.
A dialog opens with information to add about the part.
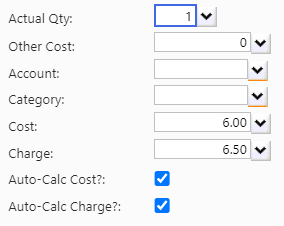
-
Enter the Actual Qty, that is the actual number of the part you're adding to the work order.
Other information, like Cost and Charge, is automatically populated based on how you configured the part.
-
Click Apply/Close.
Work Order Costs opens with the part you added listed as an actual cost.
The On Hand count for the part in the selected stock room decreases by the Actual Quantity you added to the work order.
Note that if you add a part as an estimated cost, the On Hand amount does not decrease in the stock room, but the Available and Reserved counts reflect the estimated part. The Reserved count shows the number of parts added as an estimated cost to work orders, and the Available count shows the number of On Hand parts minus Reserved parts.
In addition to manually adding parts to work orders, parts can be automatically added to work orders as estimated parts via procedures.