Inventory expert features
 Locating inventory parts you need to order
There may be times when, without creating a new Purchase Order, you need to see Parts that have been requested for purchase or that have hit their Re-Order point in a Stock Room. You can use the following methods to locate items that need to be ordered:
Filtering options in the Inventory module
There are a couple of filters built into the Inventory List pane that allow you to see which Inventory Parts need to be ordered. To use these filters, access the Inventory module, and then click the dropdown field in the List pane. Here we see the following filter options:
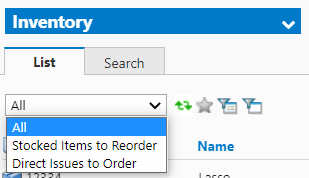
- The All option will show all the Inventory Parts stored in the module, regardless of whether they need to be re-ordered.
- The Stocked Items to Reorder filter will show any Parts stored in Stock Rooms whose count has reached its Reorder Point. As some Parts may be stored in multiple bins within a Stock Room, this filter calculates the cumulative count for a Part within its Stock Room, letting you know when a Part needs to be re-ordered to replenish a Stock Room as a whole, not an individual bin.
For more information on storing Parts in Stock Rooms, defining Reorder Points, and tracking inventory counts, see the Inventory Basics article under the "How to Add a Stock Room Association" header.
- The Direct Issues to Order filter will show any Parts not stored in a Stock Room that have been requested for purchase to fulfill a Work Order. Typically, Direct Issue Items are only ordered on a one-time, or very infrequent, basis, which is why no records for the Part are stored in a Stock Room.
Home page Inventory & Purchasing tab
The Inventory and Purchasing tab on the Home screen is designed to let you see at a quick glance all the orders that need to be placed. To access this view:
- Click the Home button at the top of the screen.
- Select the Inventory & Purchasing tab at the bottom of the Home page.

- Under the "Inventory Info" header, two links are available that will let you view the Inventory List with the two filter options for the Inventory module (described above).
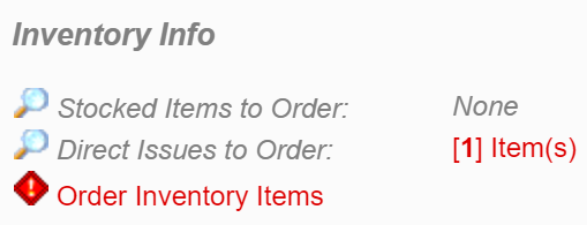
- If either of these links show a number of items in red, this indicates the number of items that are ready to be ordered for each. When numbers are present, the Order Inventory Items button will also display in red. You can select this option to access the Order Parts feature, described in more detail in the How to Order and Receive Parts article.
- The "Purchasing Info" section shows any Purchase Orders that have been requested or that are already in progress. You can use these links to take action on these Purchase Orders as needed.

Maintenance Connection provides a great Purchase Order tool for ordering and receiving Parts. You can learn more about this feature in the How to Order and Receive Parts article.
Using rotating parts
Like all Parts, Rotating (or Serialized) Parts are used to maintain Assets, but because they tend to have a longer life span than non-serialized Parts, and can be rotated in and out of service or from one Asset to another, they are stored in both the Inventory module and the Assets module. Further, as Assets, these Rotating Parts can have preventive or predictive maintenance schedules applied to them.
Creating rotating parts
Follow the steps below to change Part records into Rotating Parts:
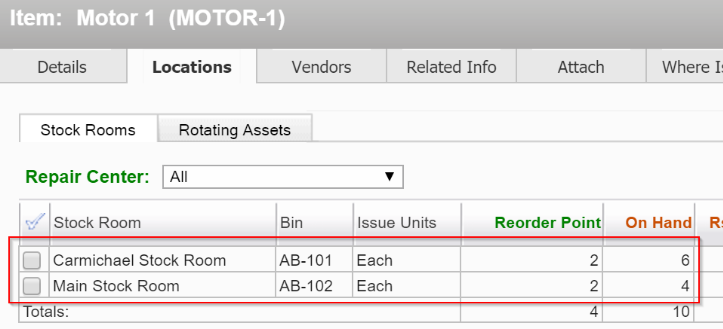
- We have navigated to a Part with two Stock Room associations, as shown in this screenshot. For future reference, note the On Hand quantities in each Stock Room.
- To turn these Parts into Rotating Parts, select the Details tab:
- In the upper right hand corner of the Details tab, click the checkbox for Rotating Part? (Serialized).
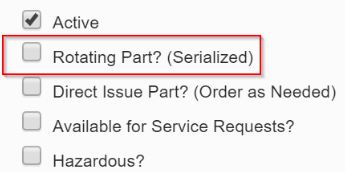
- A dialog will appear explaining how this action will affect the Part record. Click the Yes button to exit the dialog.
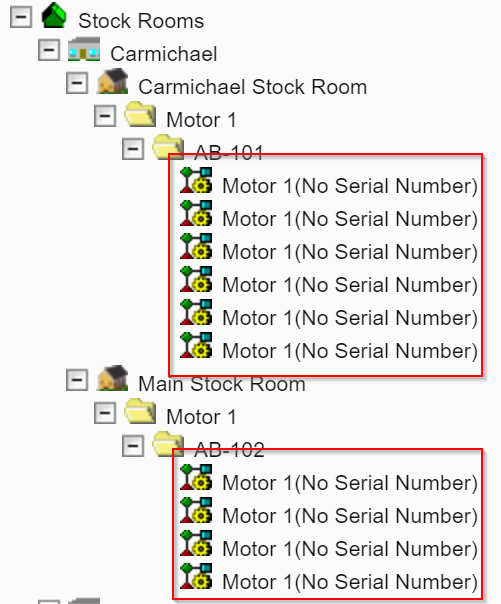
- Now, we will navigate to the Assets module, and locate the Stock Rooms parent node in the Assets List. All Rotating Parts kept in Stock Rooms will appear beneath this node of the Asset Tree, organized by Stock Room.
- In this screenshot, we have drilled down the Asset Tree to the two Stock Room associations showed above for this Part. You can see a number of Rotating Parts that now exist as Assets, corresponding to the On Hand quantities given in the Part record for each Stock Room.
Tying rotating parts to an asset
Maintenance Connection supports the ability to track Rotating Parts as they "rotate" out of a Stock Room and into service maintaining an Asset record. The easiest way to affect this rotation is within the Asset Tree. Follow the steps below to see how this works:
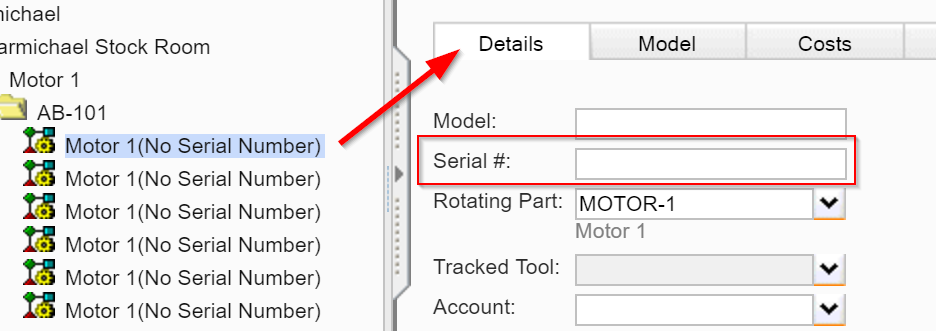
- Continuing with the Rotating Parts we created above, you can see that these records do not have a defined Serial Number. It is important to define these Serial Numbers from the Assets module, since these Parts cannot be rotated into service without a Serial Number. The Serial Number can be defined in the Details tab and Details sub-tab of the Asset record for each Rotating Part.
- Once you have given a Rotating Part a Serial Number, right-click on the Part in the Asset Tree, and select the Cut option to remove the Rotating Part from its Stock Room location.
- Now, right-click on the Asset that the Rotating Part will be maintaining/servicing. Select the Paste option. This will make the Rotating Part a child Asset beneath the Asset it is maintaining/servicing.
- This adjustment in the Asset Tree will also decrease the On Hand quantity in the Stock Room location for the Part, as shown in the Locations>Stock Rooms sub-tab for the Part. If/when the Part is rotated out of service to the Asset, you can move it back to its Stock Room location in the Asset Tree, which will also increase the On Hand quantity in the Stock Room.
Automatically adding parts to work orders
Let's say you have a Part that you consistently have to add to a certain type of Work Order. Or, maybe you are manually adding Parts to PM generated Work Orders. Did you know you can add Parts to Procedures as Estimated Costs? Then, every time the Procedure is added to a Work Order either manually or from a PM Schedule, the Part is also automatically added as an Estimated Cost. Follow the steps below to automatically add Parts to a Work Order:
- Begin by accessing the Procedures module. From the Procedures List, select the Procedure to which you want to add a Part. The Procedure record will display in the WorkCenter on the right side of the screen. Select the Costs tab.
- Click the Add... button corresponding to the Parts (Estimates) label.
- The Inventory lookup will display, where you can choose a Part to add to the Procedure:
- In the dialog that appears, input the Estimated Quantity of this Part that will need to be used to fulfill the Procedure, and ensure that the Cost and Charge fields are accurate. Click the Apply/Close button when finished:
- This will navigate you back to the Procedure record, where the Part we just added will display. Click the Save button to save the Procedure.
- Now, we will navigate to a new Work Order record, and using the Procedure field, associate the Procedure we just saved to the Work Order:
- Save the new Work Order, and then select the Costs tab. The Part we added to the Procedure will display as an Estimated Cost for the Work Order.